If you’re working on real-time applications—like hosting a web app, setting up a development environment, or running backend processes—creating a Windows Server on Azure is one of the fastest and most scalable solutions.
In this post, we’ll walk you through step-by-step instructions to set up your own Windows Server using Microsoft Azure.
Pre requisites
Before you begin, make sure you have:
- A valid Azure account (free or paid)
👉 Go to Azure Portal - Basic knowledge of virtual machines and remote desktop
Step-by-Step Guide to Create a Windows Server in Azure
Step 1: Log in to Azure Portal
Go to https://portal.azure.com and sign in with your credentials.
Step 2: Create a Virtual Machine
- In the search bar, type “Virtual Machines” and click on it.
- Click on “Create” → “Azure Virtual Machine”.
Step 3: Configure the Basics
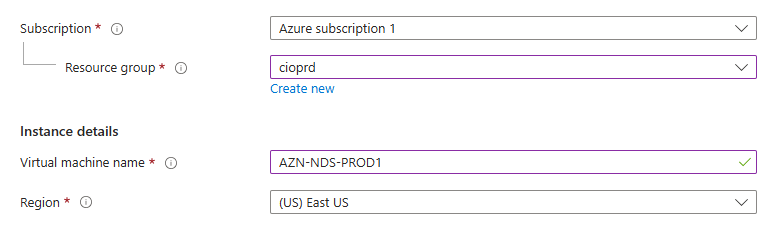
- Subscription: Choose your active subscription
- Resource Group: Create a new one or use an existing one
- Virtual Machine Name:
The name should proper format with 15 characters and unique name(Example –MyWindowsServer01) - Region: Select the one closest to your users. So, that it will reduce the latency and cost.
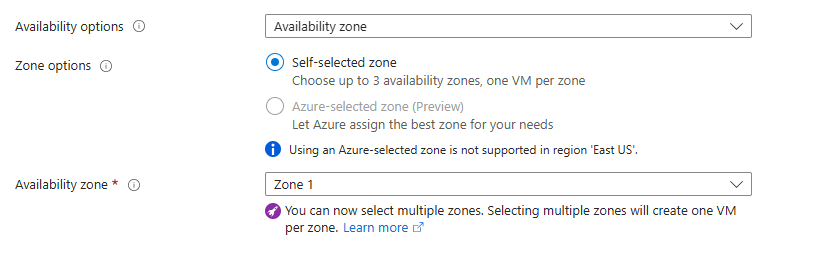
- Availability Options: Select zone or set-based redundancy to ensure high uptime for your VM.
- Zone Option: Use Availability Zones for high uptime across datacenter locations.
- Availability Zone: Ensures high availability by placing VMs in separate datacenter zones within a region.
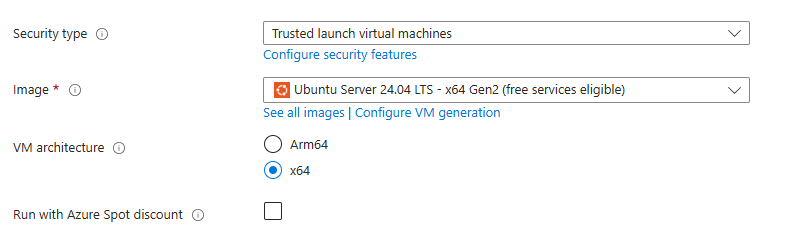
- Security Type: Choose standard or trusted launch for enhanced VM security with secure boot and virtual Trusted Platform Module. Most of the cases Standard is enough.
- Image: Based on the your organization requirements. choose
Windows Server 2022 Datacenter(or your preferred version) - VM Architecture: Defines the processor type for the VM — choose between x64 (Intel/AMD) or Arm-based architectures, depending on performance needs and application compatibility.
- Run with Azure Spot Discount: Use unused Azure capacity at up to 90% lower cost—ideal for interruptible workloads like batch jobs or testing environments.
- Size: In Azure, we have so many sizes based on the requirements and the load of your application(Example- Production, development or testing) we will select. Choose a VM size (e.g., B2s or D2s v3 for small-medium projects)

- Username & Password: Set admin credentials to log in via RDP. This credentials will help us to login into the serve (Keep note of the credentials!)

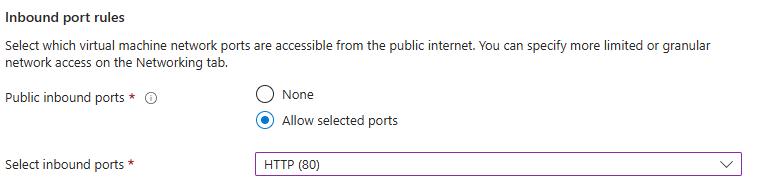
- Public Inbound Ports: Control which ports (e.g., RDP 3389, HTTP 80) are open to the internet, allowing or blocking external access to your VM. choose allow selected ports
In Basic, remaining options we will leave it as default
Step 4: Configure Disks
Encryption at Host: Encrypts data at the physical host level, adding an extra layer of security beyond standard disk encryption (Optional)
OS Disk Size: Set the size (e.g., 64 GB, 128 GB) for your operating system disk based on your workload needs.
OS Disk Type: Choose between Standard HDD, Standard SSD, or Premium SSD to balance performance and cost.
Delete with VM: Automatically deletes the OS and data disks when the VM is deleted—helpful for resource cleanup and cost control.
Data Disks: Optional disks you can attach to your VM to store application data, databases, or files—choose the size and type based on performance and storage needs. In Disks, remaining options we will leave it as default

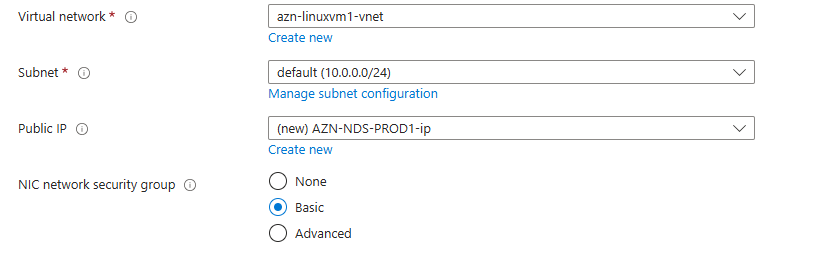
Step 5: Configure Networking
- Virtual Network: Select or create a VNet to define the VM’s network space.
- Subnet: Assign the VM to a subnet within the VNet to control internal traffic flow.
- Public IP: Most of the cases we will not use public ip for security reasons. if you want then, allocate a public IP for internet access or remote connection.
- NIC Network Security Group (NSG): Apply firewall rules to control traffic to/from the VM.
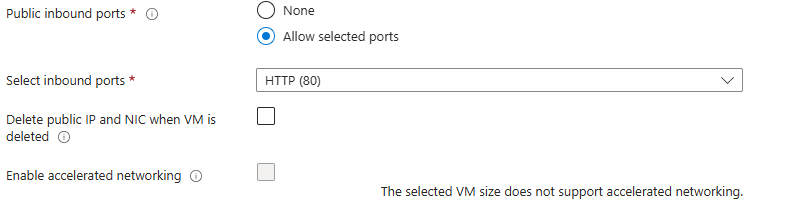
- Public Inbound Ports: This is also not recommend. if want then, choose whether to allow external access to the VM.
- Select Inbound Ports: Open specific ports (e.g., RDP 3389, HTTP 80, SSH 22) as needed.
- Delete Public IP and NIC with VM: Enable to auto-delete these resources when VM is removed.
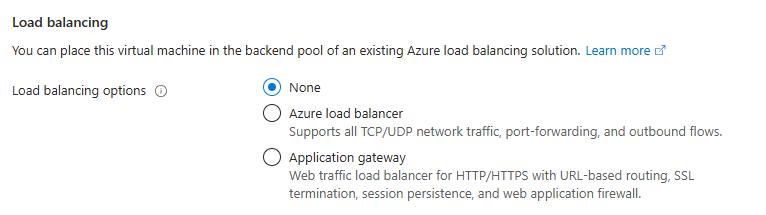
- Load Balancing: Optionally place the VM behind a load balancer for high availability and traffic distribution.
In networking, remaining options we will leave it as default
Step 6: Management
In Management, Everything we will leave it as default.
Step 7: Monitoring
Boot Diagnostics: Captures screenshots and logs from your VM during startup-helpful for troubleshooting boot failures or VM crashes.

In Monitoring, remaining options we will leave it as default.
Step 8: Advanced
In Advanced, Everything we will leave it as default.
Step 9: Tags
Tags: Key-value pairs (e.g., Environment=Production) used to organize, manage, and track Azure resources for billing, automation, or grouping.

In Tags, remaining options we will leave it as default.
Step 10 : Review + Create
- Click on Review + Create
- Azure will validate your inputs.
- Hit Create to deploy your server.
Wait a few minutes while your server is being provisioned.
Step 11 : Connect to Your Server via RDP
- Go to your Virtual Machine’s overview page.
- Click “Connect” → “RDP”
- Download the RDP file and open it.
- Enter your username and password to log in.
You’re now inside your Windows Server!
Pro Tips
- Auto-shutdown: Enable it to save costs when not in use
- Backup & Recovery: Set up Azure Backup for your VM
- Monitoring: Use Azure Monitor for performance and alerts
- Security: Add NSG rules and enable Just-In-Time VM access